This is a paid article. Please bookmark this page.
Thank you for coming to my page. My name is Kay, and I’m Japanese. I’m a photographer by profession, but I also create websites and consult on website management.
If you found this article, you’re probably someone who wants to sell your articles using WordPress, which is a very useful and excellent CMS.
On this page, I’ll show you how to sell articles using WordPress, even if you can’t do any programming.
What is WordPress…
WordPress is the most famous CMS (Content Management System) in the world. It is said that about 1/3 of the websites in the world are constructed with WordPress. Not only for personal blog sites, but also for corporate or public websites, WordPress is chosen.The Advantage of WordPress
- You don’t need programming knowledge.
- You can create almost any site with a variety of themes and plug-ins.
- The responsive design (optimized for smart phones) .
- Easy to SEO
There are many subscription-type plugins in WordPress, but I don’t see many plugins that sell each time from a single article.
If you’re a blogger or freelancer, you’ll feel the pressure of having to write regularly on a “subscription” basis. That’s why we often hear about wanting to sell each time from a single article.
Certainly, it’s the strongest if you can sell your articles individually using the world’s best website creation system. Stylish, strong in SEO and user-friendly. Is it even possible to do that?
As it turns out, you can. What’s more, the sales commission for the article is only 3.6%.
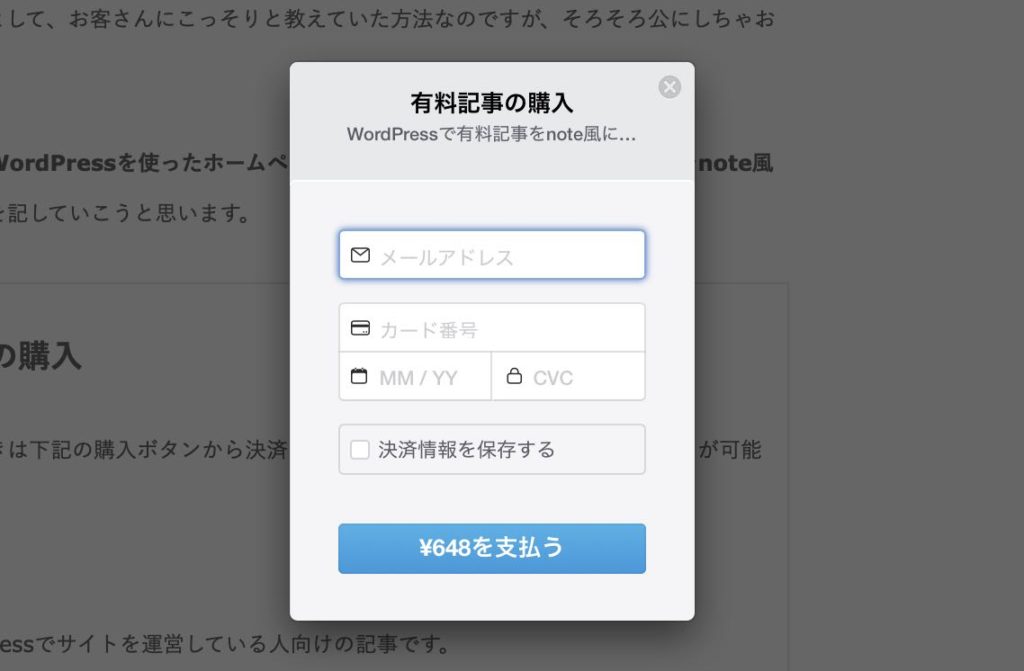
The actual payment page looks like this.
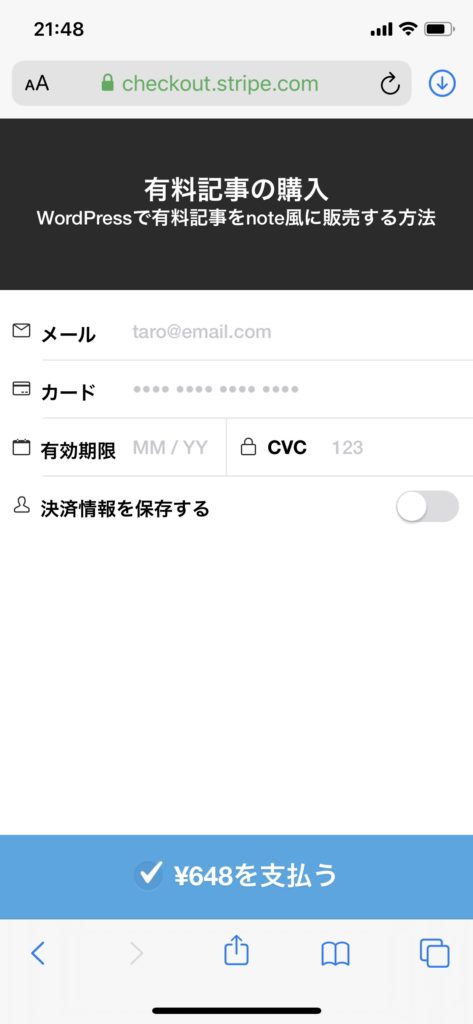
This is what it looks like from a smart phone. It’s properly responsive.
A payment page with a sense of security.
So, let’s start MY explanation!!
Overall flow
The overall flow is the 11 steps as above. There are a lot of them, but don’t worry, most of them are default settings and only 4-2 to 6 are repeated when you actually write paid content or paid articles.
1. introduction of the payment system “Stripe”
The first thing to do is to introduce a payment system, since WordPress itself does not have a payment system, you need to register it separately. In this case, we will use a payment system called Stripe.
What is Stripe…
Have you ever seen a payment system called Paypal? You’ve probably seen or heard of it. Stripe is also one of the most used online payment systems in the world, as is Paypal.
The Advantage of Stripe
- It’s run by a company we can trust.
- Available in a variety of languages
- Payment and management screens are easy to use.
- Sales statistics can be checked.
1-1. Create a Stripe account
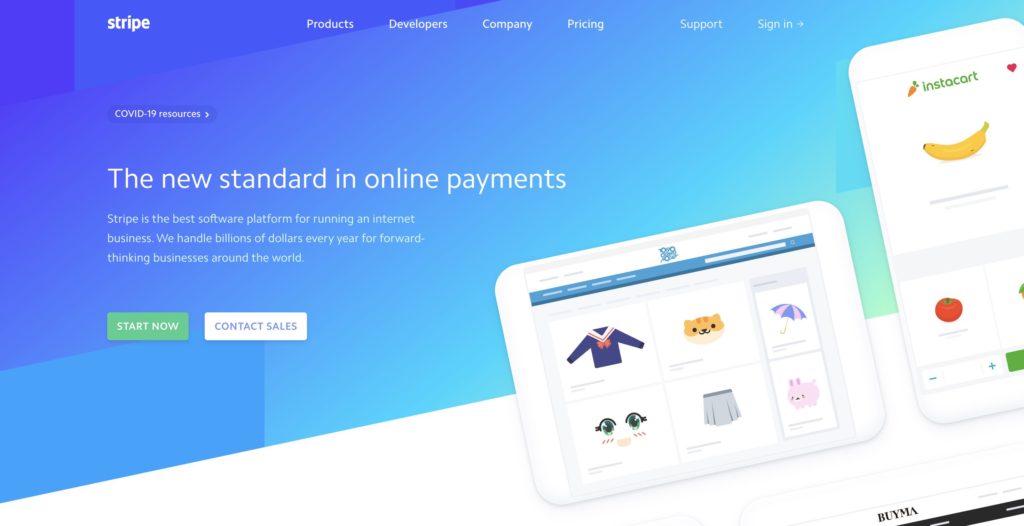
So, let’s start by opening the official Stripe website and creating an account. Open the link and select Start Now, and you’ll find the page like this.

Enter your information, such as email address, name and password. You will receive a verification email at your email address you set up, and click there. It’s a common one. Your account creation is now complete.
After logging in, you may be asked about how to use Stripe. “Skip now” is okay.
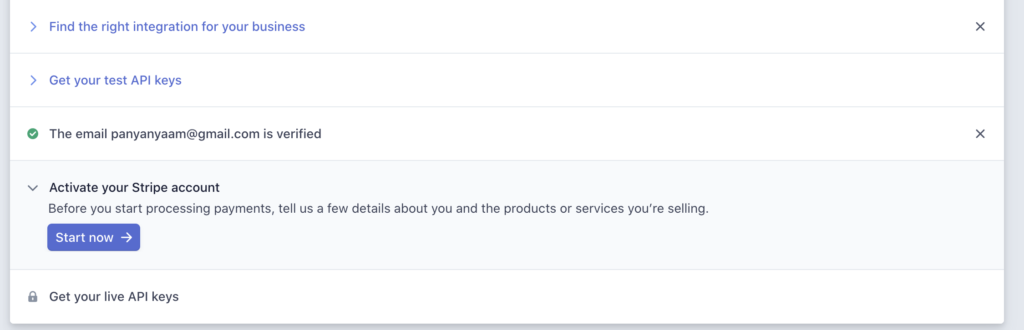
The Stripe administration screen will come up. Select “Enable Stripe account” and start. You will be prompted to authenticate your email if you have not already done.
1-2. business information
After your email is verified, you will be asked about your business information.
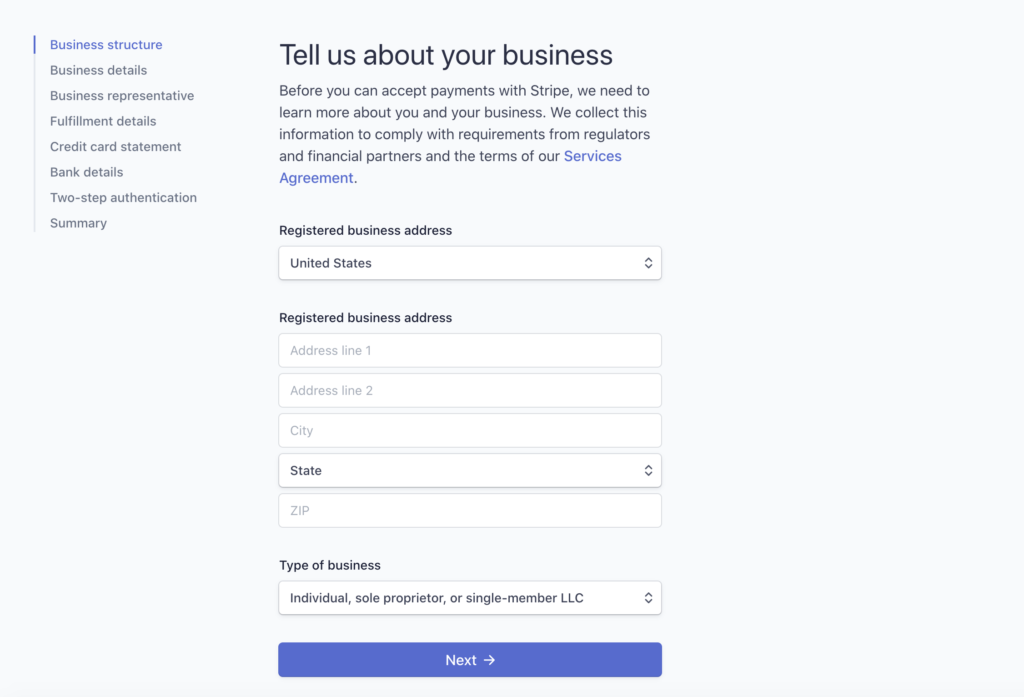
Let’s answer questions honestly about your business model.
1-3. Get the Secret Keys
Finally, you’ll get a public/private key to tie Stripe to WordPress. Please select Developer > API Key in the sidebar (bottom left of the screen).
The words “Public Key” and “Secret Key” and the sequence of alphanumeric characters will be displayed. When you press “Reveal test key token”, the “Secret Key” will be displayed.
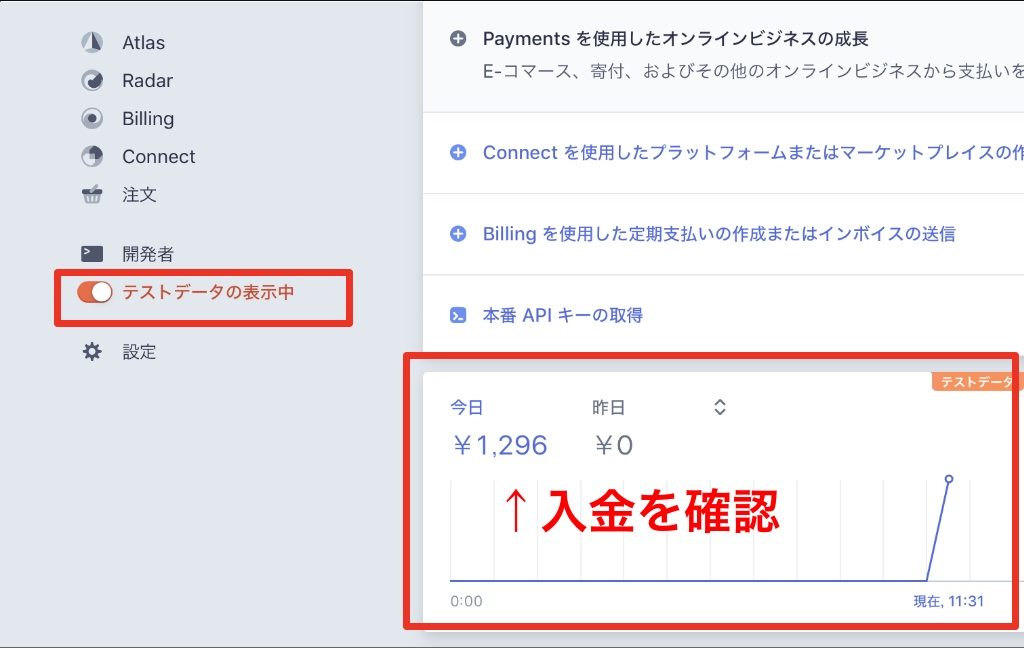
In the lower left corner of the screen, there is a check “Viewing test data” , and by default, this is turned on. When this is turned off, the key for production will be displayed instead of the one for testing.
The test and production keys will be copied to WordPress in the next step: log in to the WordPress admin in a new window, without closing the window in which Stripe is open.
2. Setting up plugins in WordPress
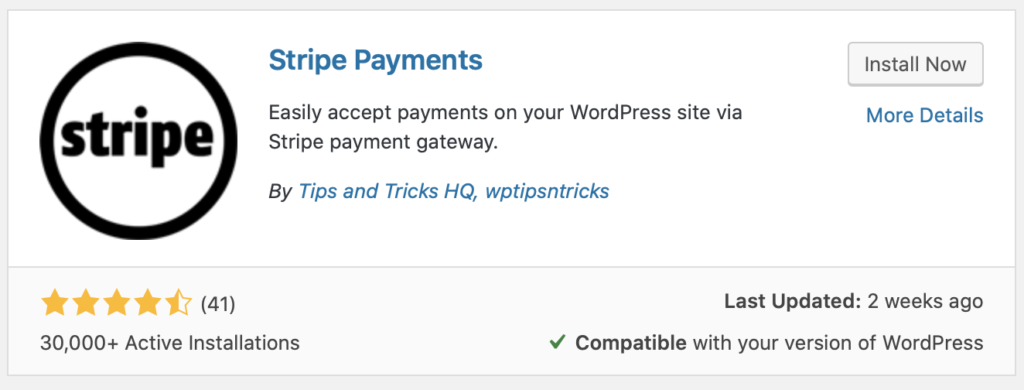
2-1. Install the plugin
Log in to WordPress and go to Plugins > Install screen. On the Add New Plugin screen, type in the keyword “Stripe Payments”. In the search results, click “Install Now”. After install it, the button changes to “Activate”, so you can do it.
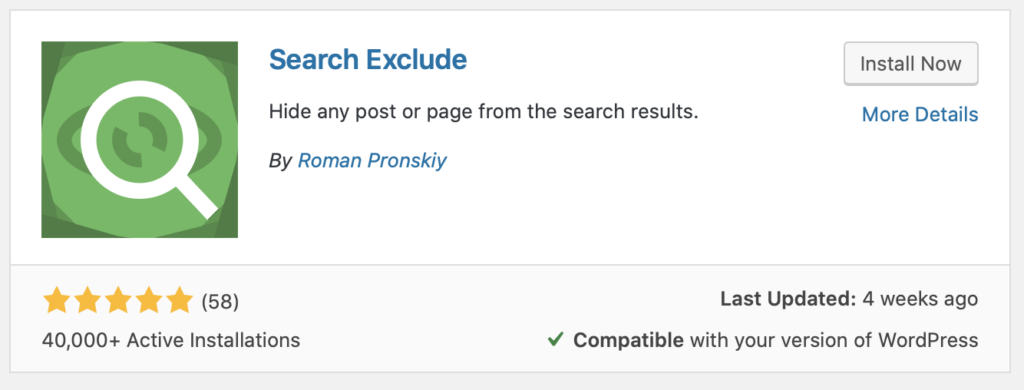
You’ll also need to install plugins for later use. Use the same procedure to search for “Search Exclude” and install and enable it here as well.
2-2. Setting up Stripe Payment
The plugin Stripe Payment is a plugin that makes it easy to put Stripe in WordPress. In the sidebar, select Stripe Payments>Settings.
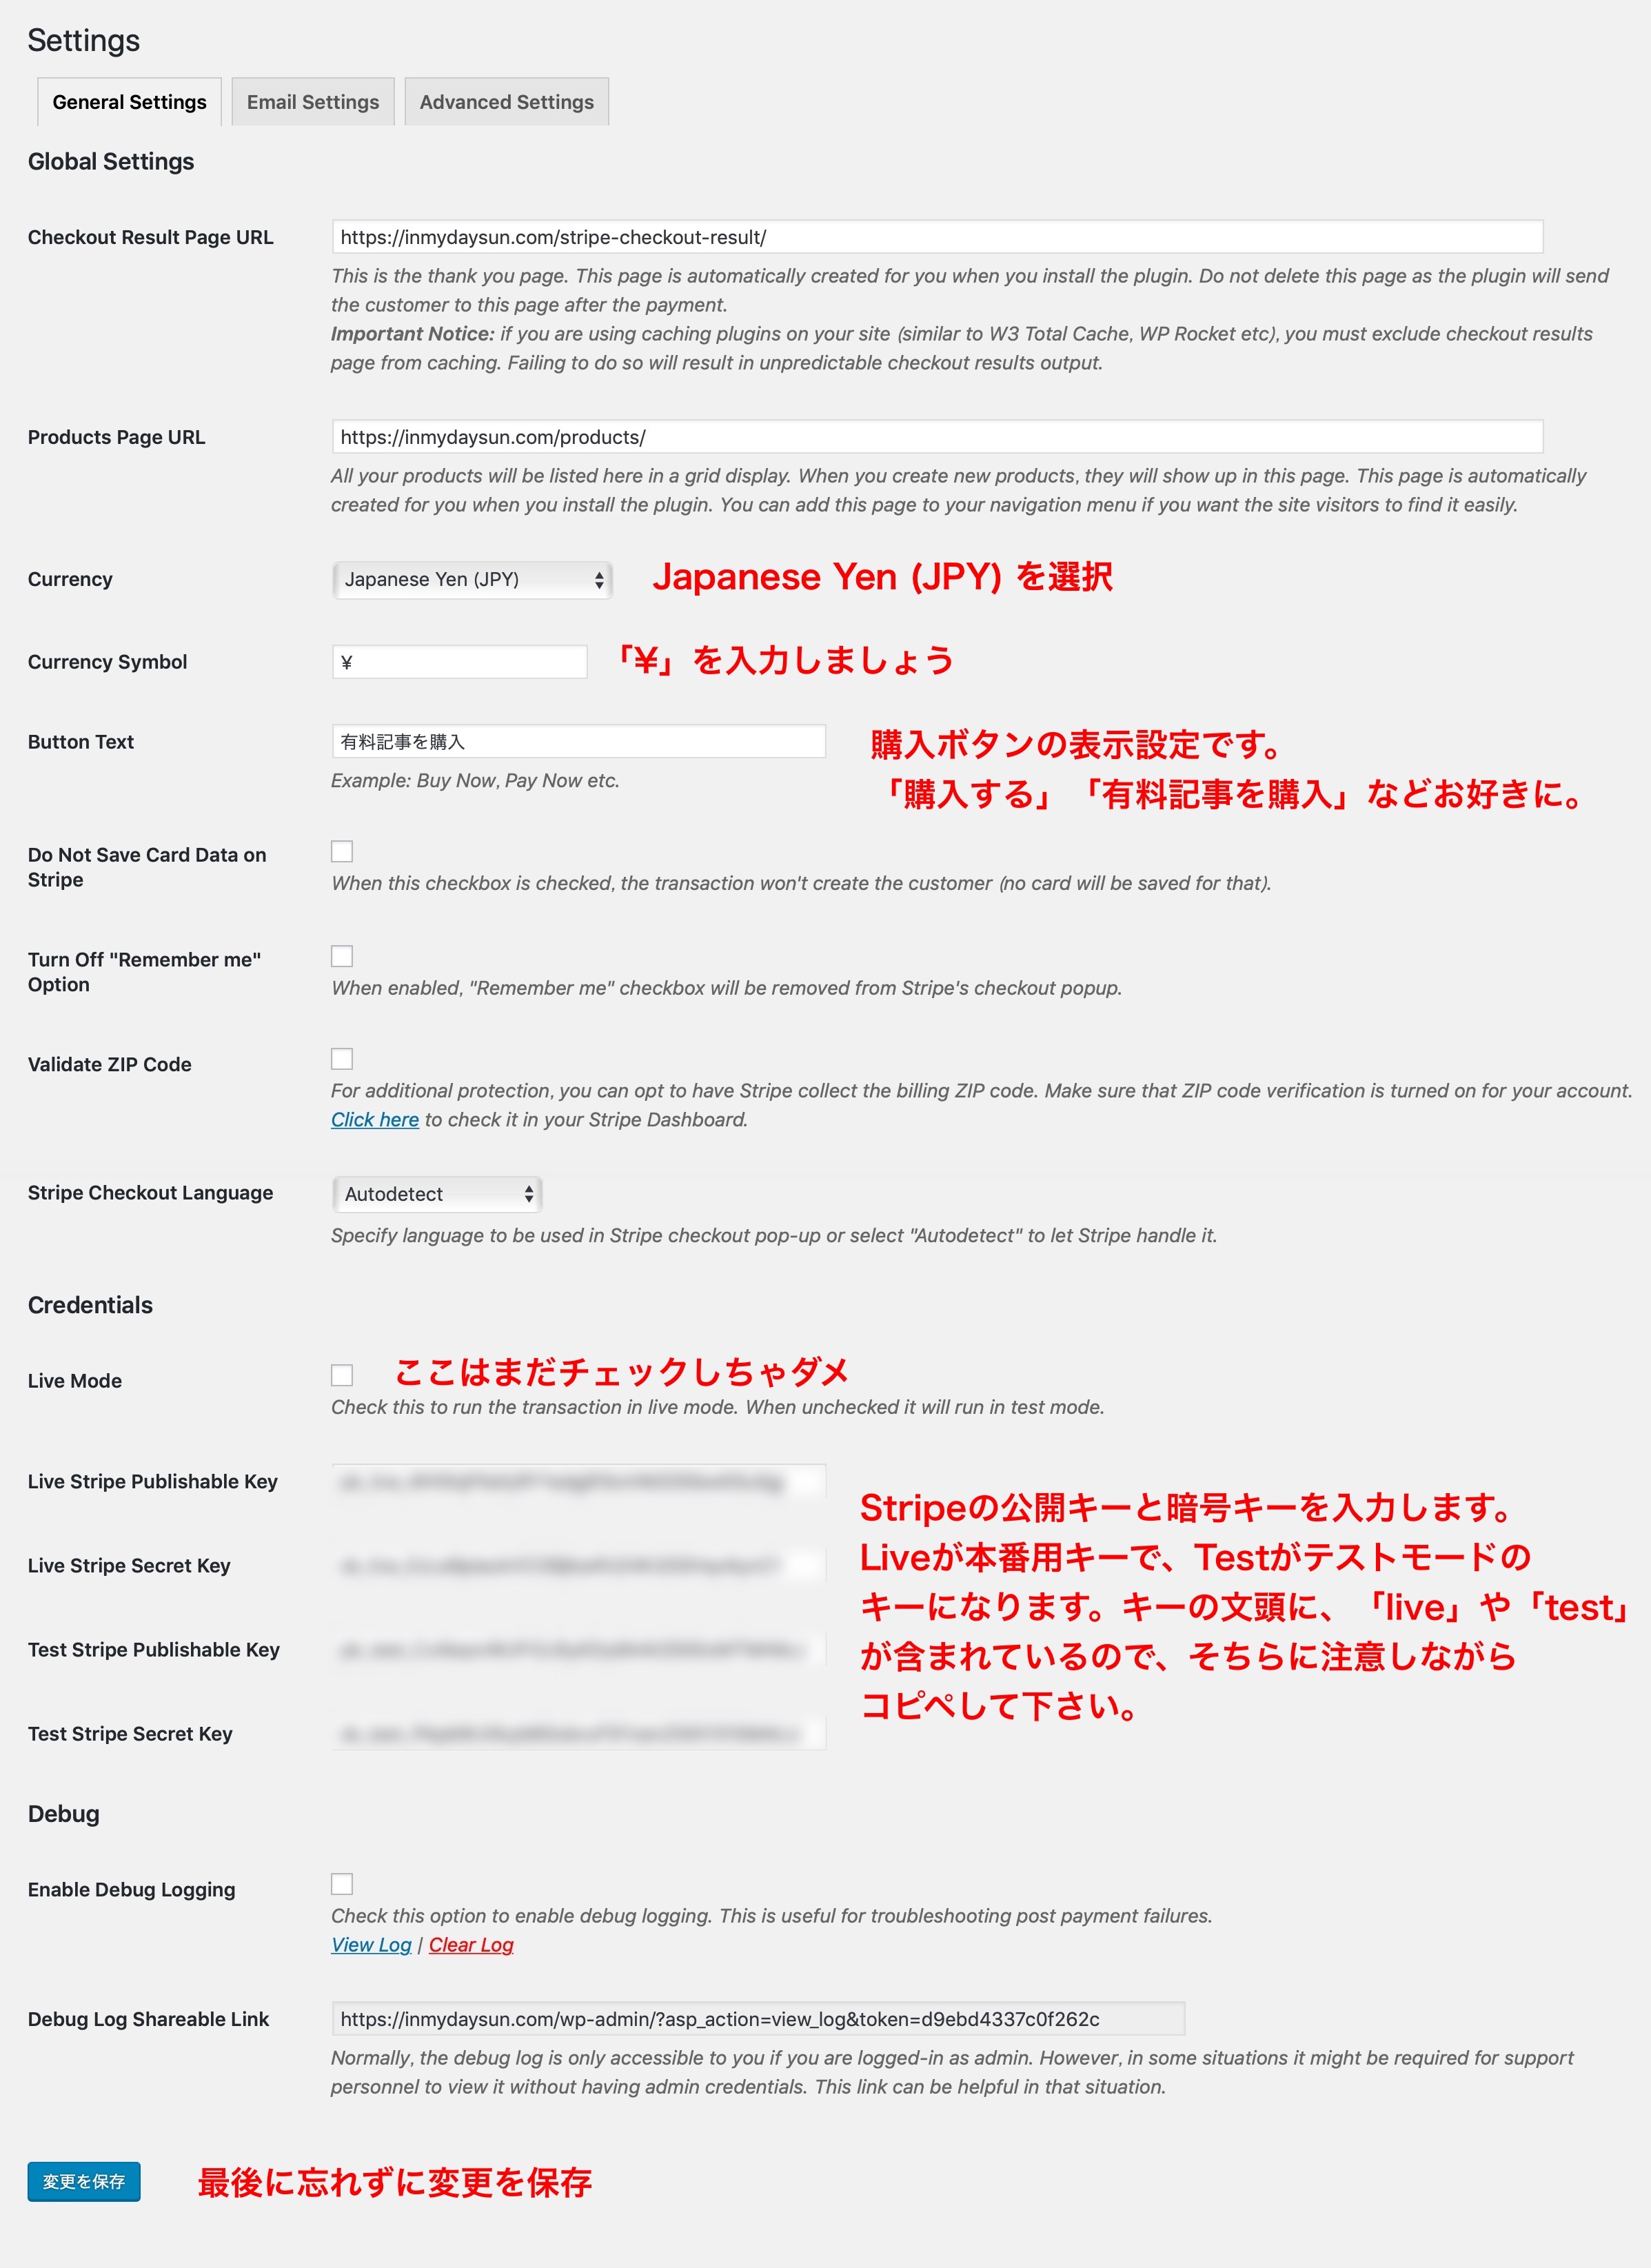
General Settings
General Settings. This is where you enter your Stripe encryption key.
Email Setting
Next, edit the following sections from the Email Setting tab.
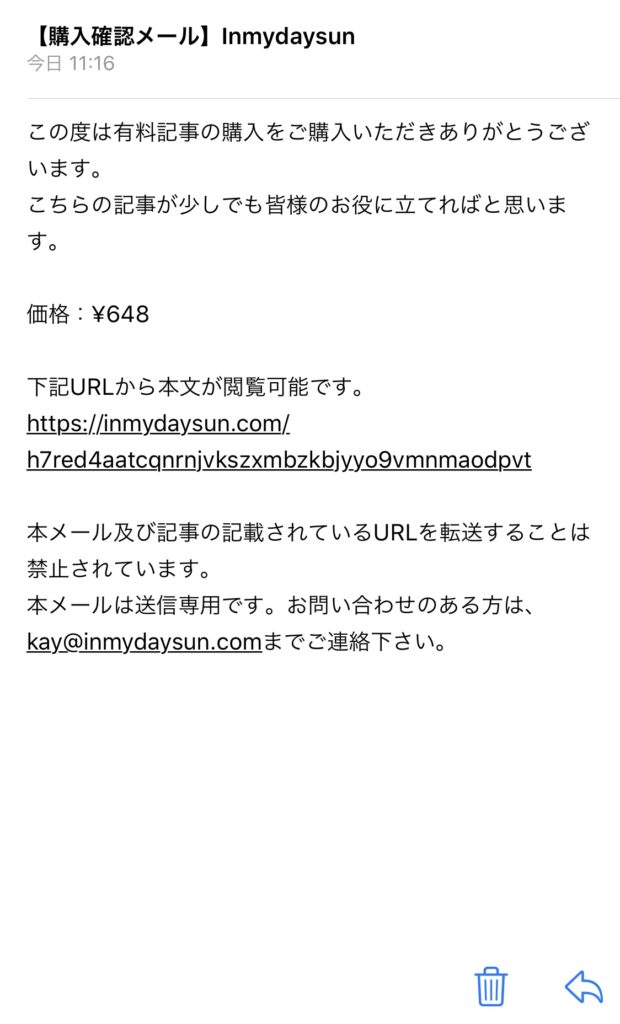
Buyer Email Body
You can also use the TAG to send an email reflecting your purchase. Here’s the text I’m using as a reference.
______________________________________________________________.
Thank you very much for purchasing {item_name}.
We hope that this article will be of some help to you.
Price:USD{item_price}
You can read the paid content from the following URL.
{item_url}
It is prohibited to forward the URL of this e-mail and the article.
This email is for transmission only. If you have any questions, please contact us at ~@○○○○.com
______________________________________________________________.
Advanced Settings
Edit the last tab. There’s not much to edit here, just type “2”,”1″ or “-1” in the Number of Decimals field. This is a money digit setting. So, it depends on which currency you will choose. In the case of U.S. dollars, the expression “0.1 dollars” is also often used, so it’s a setting to decide what to do with the decimal point.
The default value is 2 If you want to change, please understand that “0” is not allowed in the system.
3. Descriptions based on the Act on Specified Commercial Transactions
It is related to Japanese law “Specified Commercial Transactions”. So, if you don’t need such description, please skip section 3.
3-1. Compliance with the Act on Specified Commercial Transactions
This is not directly related to the payment function, but is a rule for all online payments in Japan, regardless of Stripe. If you don’t do this properly, you may be prohibited from using Stripe. I’ve made it so that you can copy and paste the bare minimum, so please use it.
Create a fixed page by going to Fixed Page > Add New. The title should be “Description of notation under the Act on Specified Commercial Transactions. Feel free to permalink. I have it as a “tradelaw”.
There are so many items listed in the Special Commercial Transactions section. Basically, it even includes the name and address of the operator. However, if certain conditions are met, personal names and addresses can be omitted.
There are thousands of different types of advertising, and the advertising space, etc., varies. Therefore, if an advertisement indicates that a document stating these matters (or e-mail in the case of Internet mail order) will be provided “without delay” upon a consumer’s request, and measures are taken to ensure that these matters will be provided “without delay” upon actual request, some of the matters may be omitted from the advertisement as shown in the table below. (Proviso to Article 11 of the Act) Quotation source: Specified Commercial Transactions Act website
Translated into easy-to-understand terms, it looks like this.
Even if you are told to advertise the notation based on the Act on Specified Commercial Transactions, there are various ways and spaces to advertise, and there are times when it is impossible to write all the information. So, as long as you make it clear on the page that you will provide an email with this information as soon as possible (within about a week) when the customer requests it, and you are ready to provide it “without delay” when the customer actually requests it, you can omit some of the information as shown in the table below. (Proviso to Article 11 of the Act) Quotation source: Specified Commercial Transactions Act website
Then, it is the minimum notation as below.
3-2. writing sample
| URL | https://inmydaysun.com/ |
| sample@inmydaysun.com | |
| Price | 540 yen (tax included) or 1080 yen (tax included) |
| Shipping | There is no shipping charge for e-book sales. |
| Payment method | Credit card |
| Necessary expenses other than the price of the product. | Payment fees such as bank transfer fees and card payment fees.Communication fees required for Internet use (the amount shall be as determined by each service provider to which the customer has contracted) |
| Delivery time | We will deliver the product by email after the payment has been made. |
| Method of delivery of goods | After purchasing the product, jump to the product page. Also, the URL with the product page will be sent to the email address entered by the customer. |
| About defective products | If the download is not successful, please contact us and we will send you the data in another way. |
| About returns | Due to the type of the product, we cannot accept returns or refunds after the purchase is confirmed. |
| Remarks on expressions and products | The expressions and reproducibility shown on this product may differ from individual to individual, and do not necessarily guarantee profits or effects. |
We will provide other matters other than the above without delay if requested at the time of the transaction.
↑Don’t forget to copy the red part too!!!! If you omit this information, be sure to include the selling price, shipping costs, and other costs.
After you created the page, please incorporate it into your header or footer menu.
4. Create a paid content page (paid article)
Well, it’s finally time for the article submission. What you’ve done so far is the initial setup and you won’t have to do it again. When creating the second paid article, you can simply repeat the following.
One prelude before you post your article: make sure that you have the freedom to create permalinks in your WordPress settings.
4-1. allow the user to set Permalinks freely
Permalinks are, in short, the URL of the page. If you have a blog or website, most of you have already set it up, but in the default settings of WordPress, it is set to automatically generate URLs from the date.
There are various preferences, but it is said that the form of category > article name is more likely to be analyzed by search engines (there are some theories), so let’s set it to that form for the time being. If you have already changed this URL to an optional one, please be careful how you enter it.
Let’s get on with it. Go to Settings > Permalinks Settings and select Custom Structure in Common Settings. Enter the following.
- /%category%/%postname%
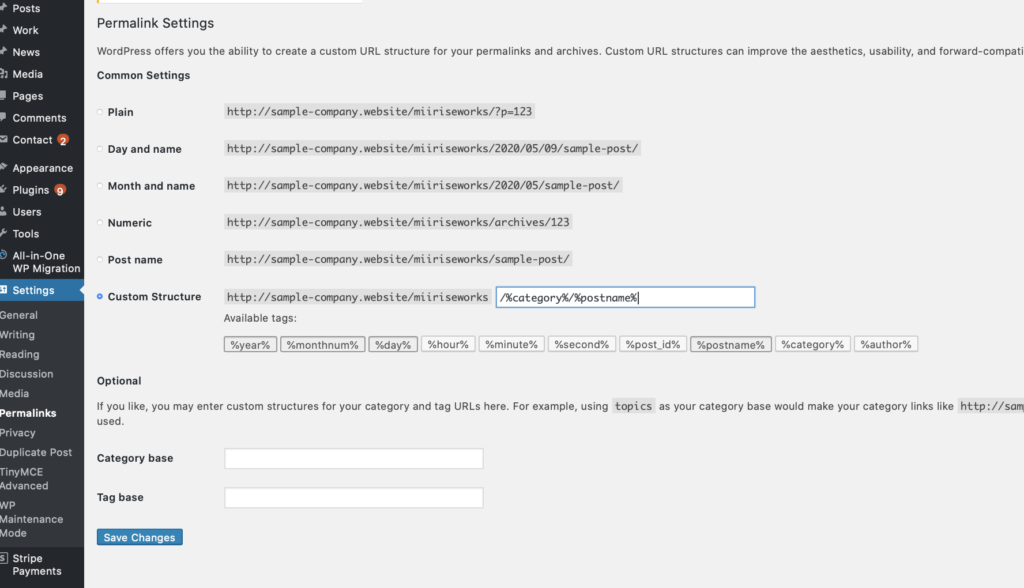
- Don’t forget to click “Save Changes”.
4-2. write a paid content page as Pages
Writing paid content pages, which means free pages is different…? As you may have guessed, when you write paid articles in WordPress, you need to separate paid article and free articles.
It may feel a little tedious, but it doesn’t actually become a big hassle because the free page only needs to copy and paste the part of the paid page that you want to show.
Create New Page
Now let’s create a paid content page. One important thing is that you should create the article as not “Posts” but “Pages”.
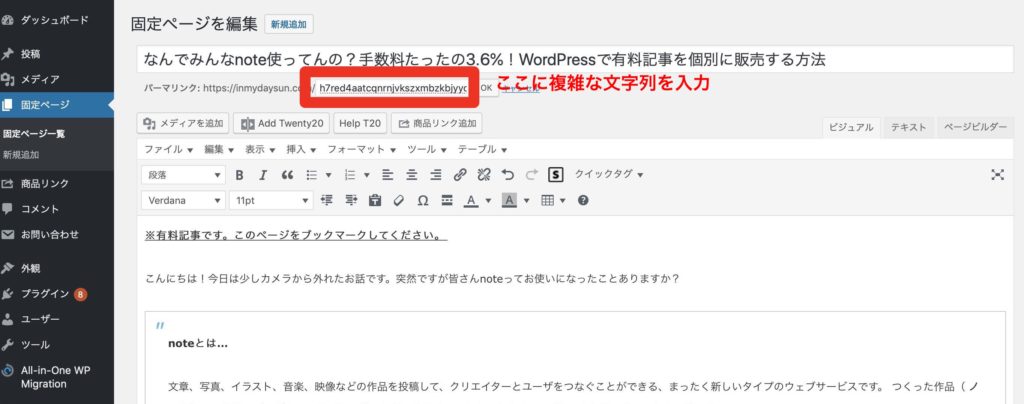
Making a complicated permalinks.
After you’ve written the article, edit the URL. Create a paid page as a hidden page that will not be linked from any page.
If you set a simple URL, there is a chance that the person who typed the URL inappropriately will find the page by luck. Set a long and complicated URL that only the person who buys the page can reach.
Any long string without any regularity is fine, but you can also use a password generator to create an irregular string.
Now only people who know this URL directly can reach this page.
Make the page un-findable by search engines such as Google.
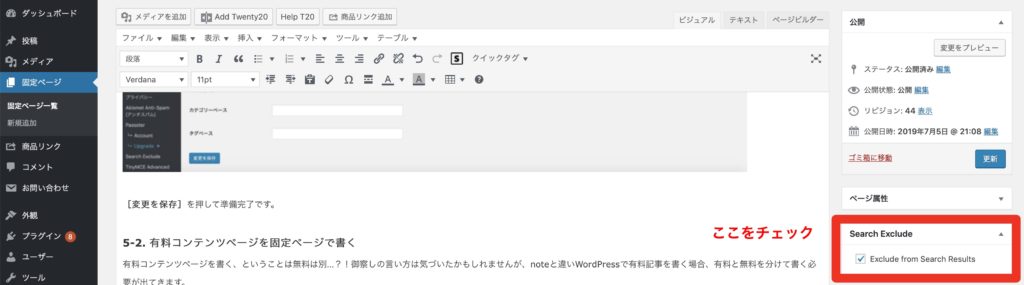
There is one more important thing. There’s no point in making your URL confusing if they’re caught by search engines. So, you need to make sure that the search engines don’t find the page.
Therefore, “Search Exclude”, which was installed in 2-1, is useful. This plugin will exclude the specified pages from the search filter. It’s super easy to do. There is an Exclude from Search Results checkbox for Search Exclude on the fixed page, so just check it here.Yes, that’s it.
5. Create a product
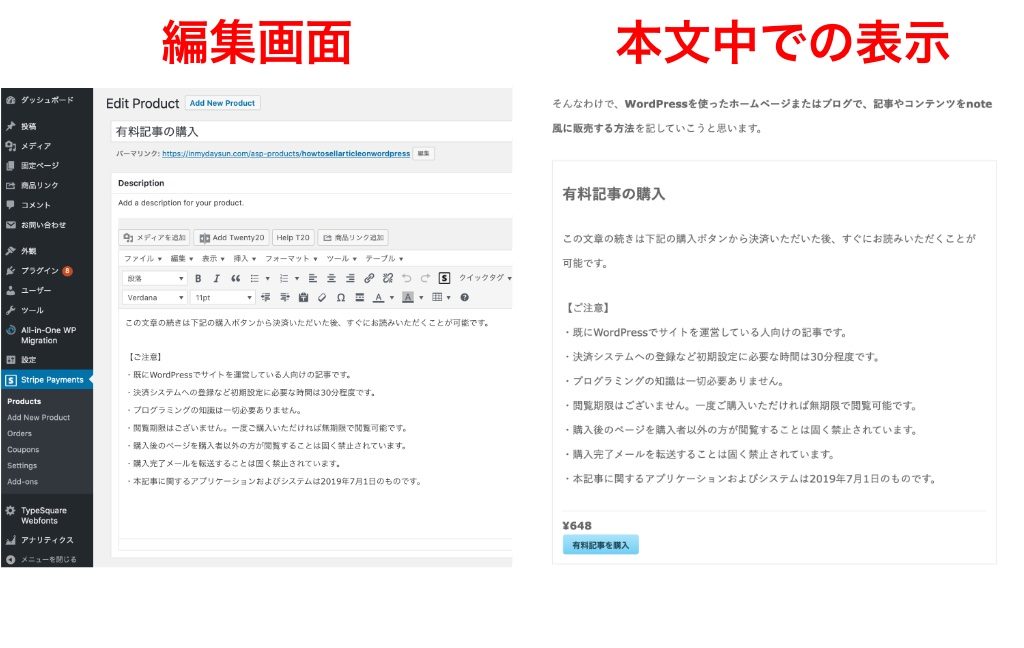
You’re probably wondering, “What is a product? The product in this article is a “paid article (a mechanism for links to the article to jump)”. It would be faster if you could see the image below for a concrete image.
Please Choose Stripe Payment>Products>Add New Product.
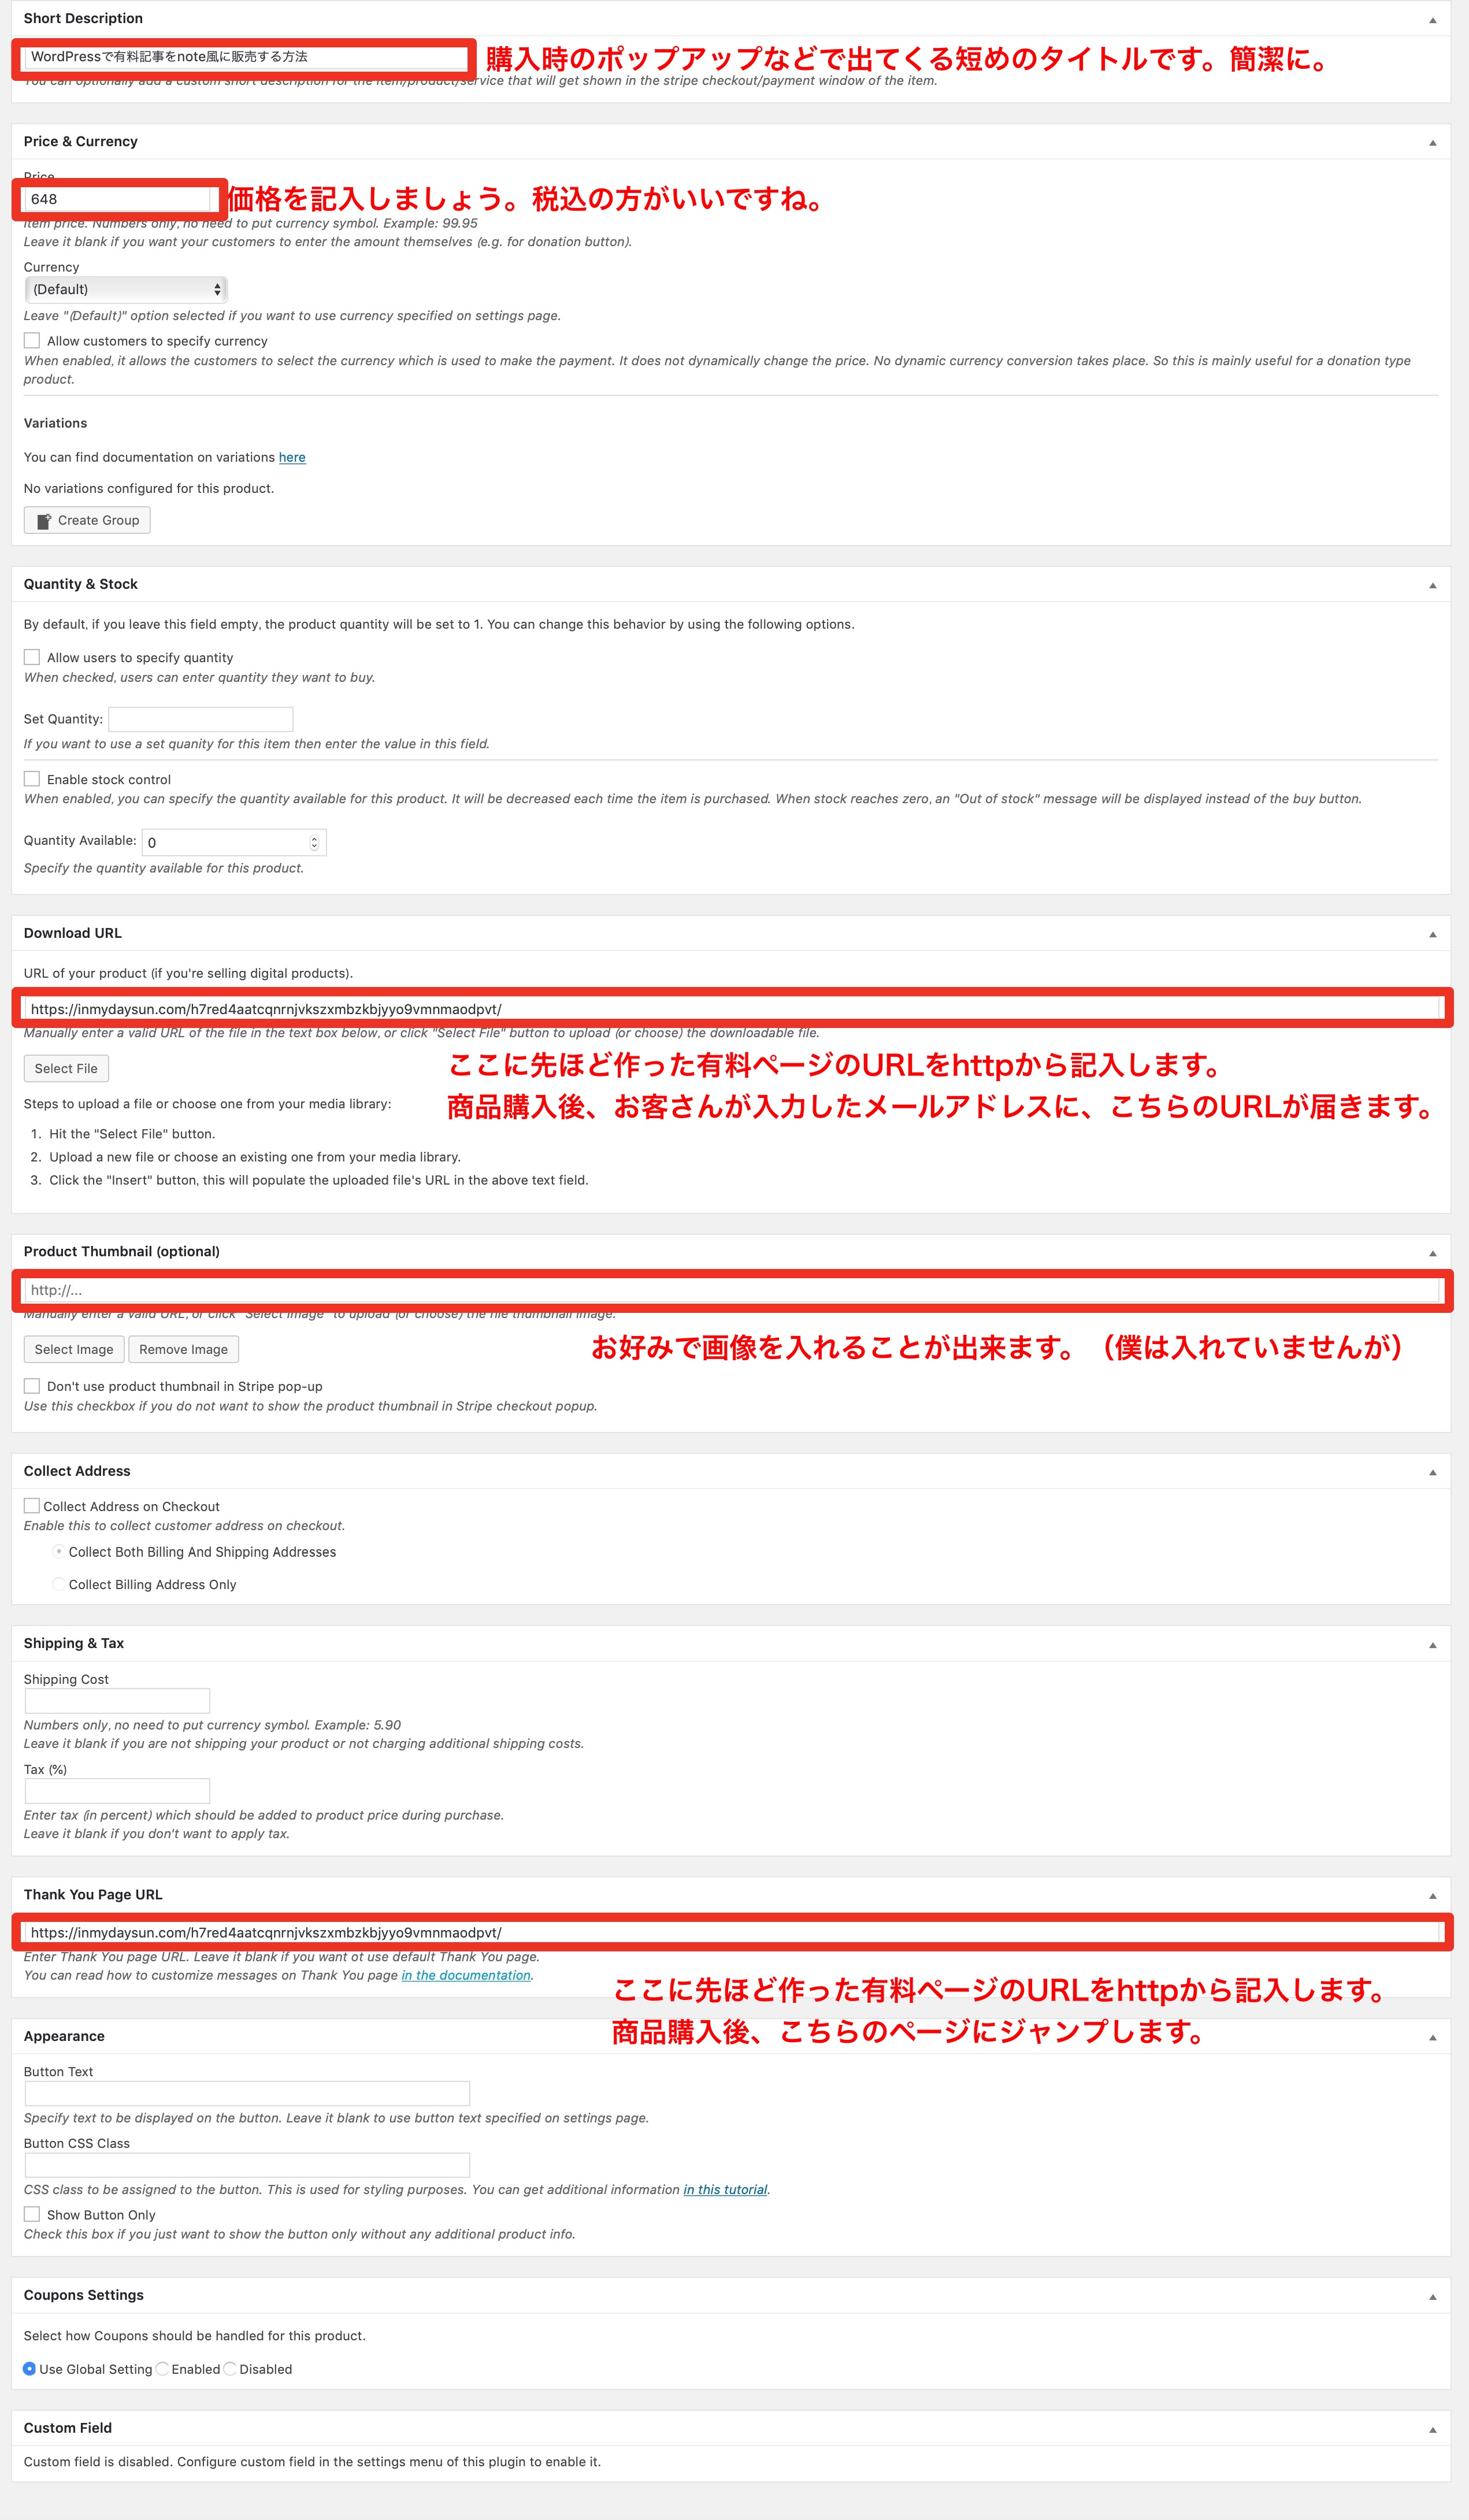
You’ll get an input form similar to a post or a fixed page. As shown in the following image, it is reflected in the place where it is paired.
After entering the body of the Add New Product, scroll down to the bottom and you will see a cell where you can set the price of the product, etc. This is also illustrated by an image.
It is now complete. Press the Refresh button to exit.
A new product has been added in Stripe Payments>Products.
6. Create a free article (introduction page)
The next step is to create a free page for the introduction. Earlier, we created as Pages, but here we’ll create as Posts. Copy the part of the paid page that you want to show, and paste it into the free page.
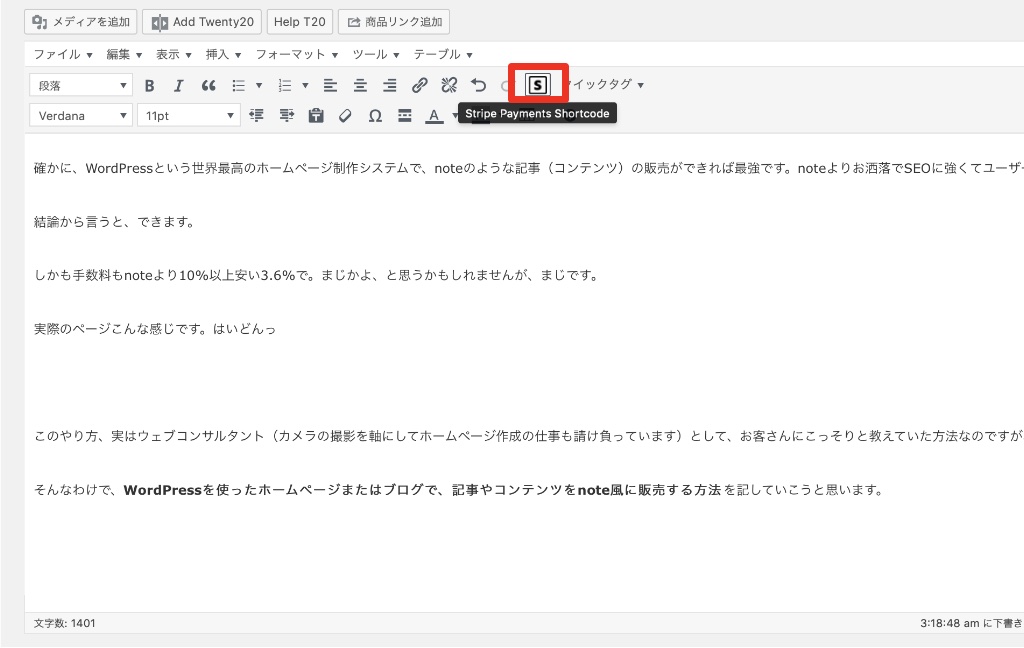
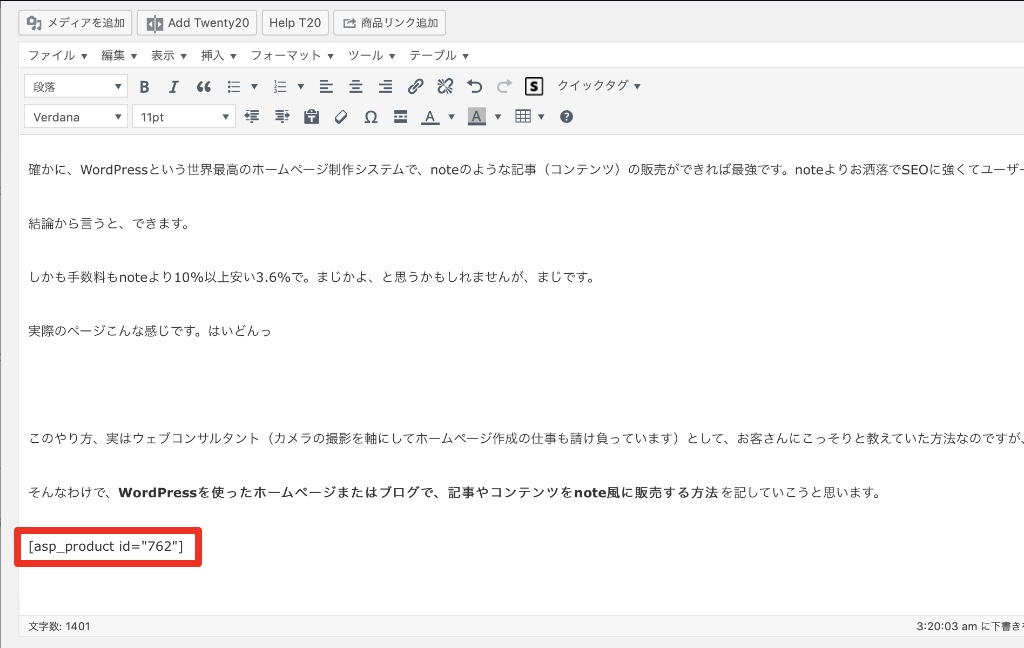
Next, place the short code of the payment product you just copied under the article. You can embed the shortcode with the S mark in the font selection corner.
Call the Product we just created.
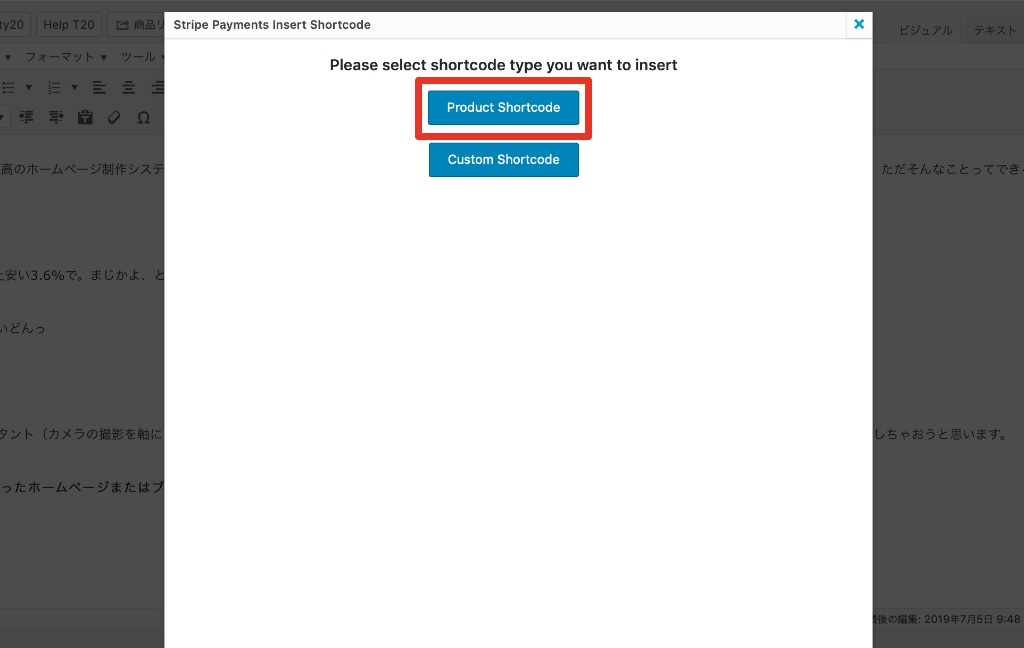
Select the Product name and press [Insert Shortcode].
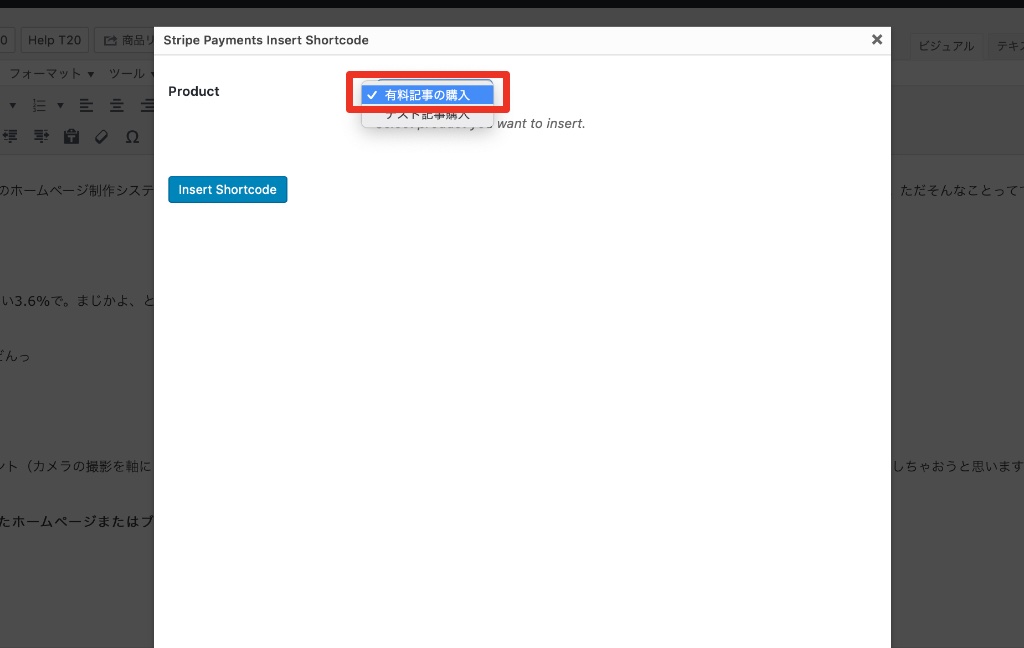
The part enclosed in red is the shortcode for this product.
Let’s preview the changes to see how the article looks.
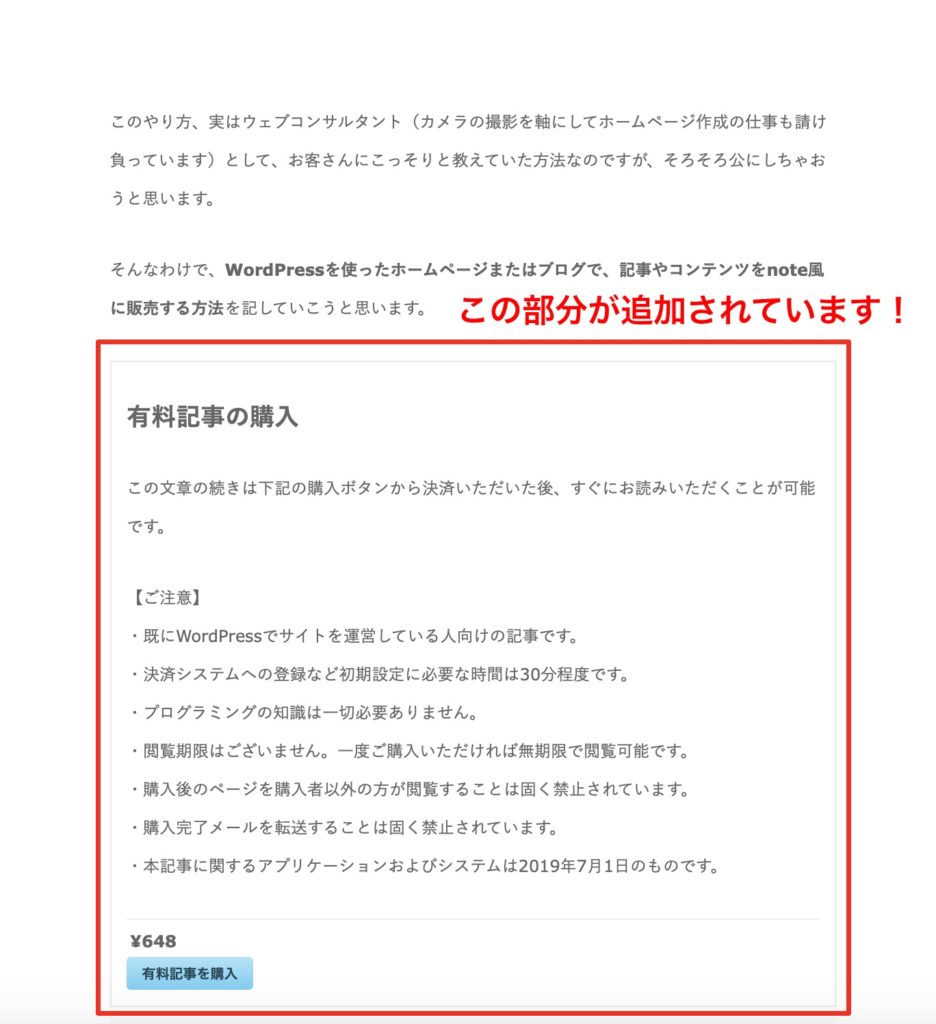
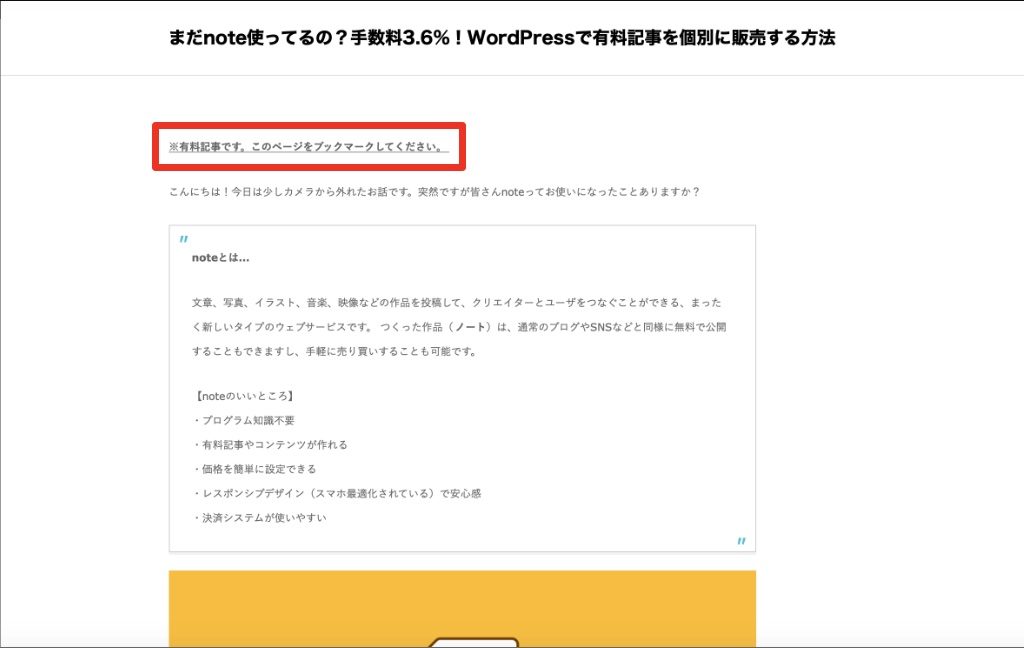
After purchasing a product, you will be redirected to a fixed page, so you may want to write a note like the one below.
After the purchase, you will jump directly to the paid page.
If you want to bookmark the page after the jump, please do so.
You can also add it to the notes in “5. Create a settlement product”.
In addition, this is also an insurance policy, but the email is set up in the Buyer Email Body setting of 2-2. If the customer enters the correct email address when entering the card information, the URL of the paid page will be sent to that email address.
In addition, the purchaser’s email address is also stored in Stripe, so if you have any questions, you can check there and resend it from the administration screen.
Translated with www.DeepL.com/Translator (free version)
7. Confirmation of operation in test mode
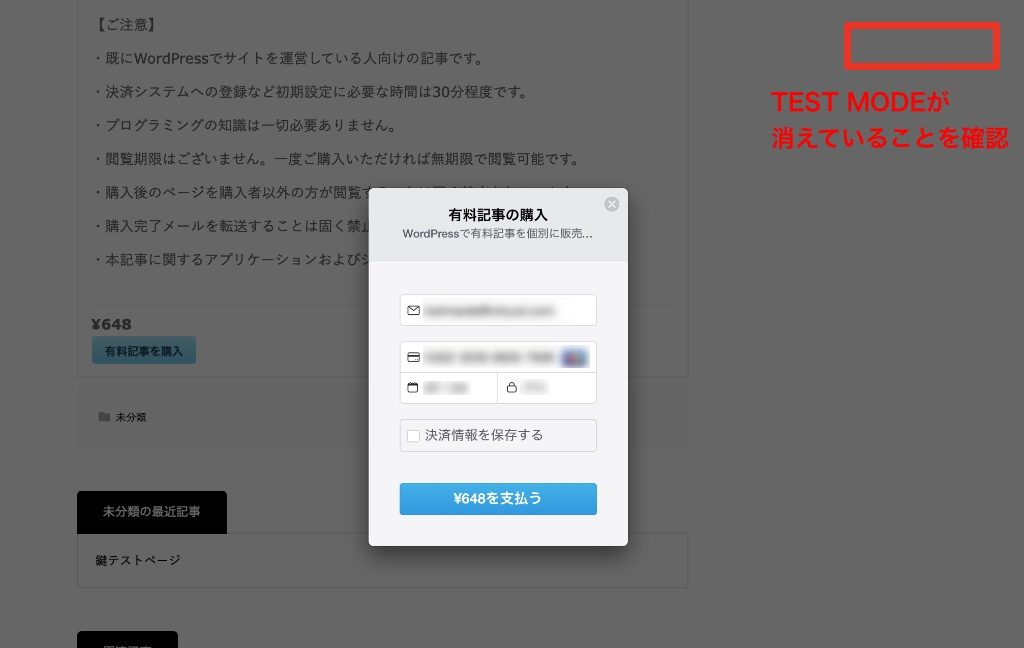
Stripe Payment is initially set to TEST mode, so even if you make a payment, the actual payment will not take place. Make sure to test it before you put it into practice, as it will allow you to make sure that your form works properly.
Click on “Buy Paid Articles” and a payment pop-up will appear. Make sure you see a pop-up message “TEST MODE” at the top right of the screen. If you don’t see it, you may be in production mode by mistake, so please review the “General Settings” in the “2-2.
When you see the TEST MODE icon, you can enter the card information for the test here.
Translated with www.DeepL.com/Translator (free version)
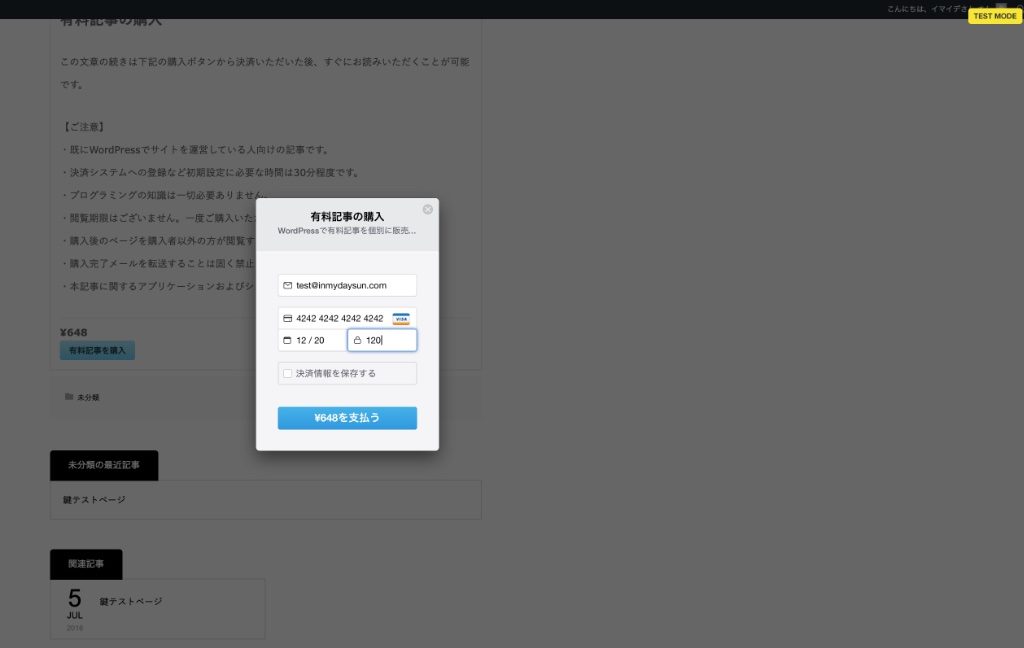
Email: Enter the email address you actually use.
Card: 4242 4242 4242 4242 4242 (this is a published test number).
Expiration date: 10/22 (any month and year prior to today’s date will be accepted)
CVC: 120 (anything here is OK.)
Let’s settle with this. The “Save payment information” is an optional item. When you check the box, the form to register your phone number will appear. Once you have registered here, you can omit the credit card number on the Stripe payment site, but this time it’s a test number, so you don’t need to save it.
※ Postscript on March 30, 2020.
It seems that the Stripe API version and the Stripe Payments plugin are incompatible and may cause errors that prevent payments from being made.
If you are still unable to proceed after pressing the payment button, please check the following places.
Settings > Stripe Payments > Advanced Settings > Additional Settings > Check the Enable Legacy Checkout API
Press [Pay USD] to jump to the paid page. Yes, it was successfully displayed.
Please make sure that the email address you entered has received the email listed on this page. This time, I checked with my smartphone. Yes, it was delivered.
8. Confirmation of payment on Stripe
Now, the purchase in test mode is complete. Now let’s go back to the Stripe dashboard and make sure that the test payment is reflected on the Stripe side.
9. Operation check in production mode
It’s perfect until the test deposit. Now it’s time to test it in production mode. When you say “production mode”, the action is just to do the same thing again as the test mode. However, since it’s a production, we’ll test it with a real credit card to see if it will actually be credited.
9-1. Set to production mode.
From the WordPRess dashboard, select Stripe Payments>Settings, go to the General Settings tab, check Live Mode, and press Save Changes. This is all it takes to switch to production mode.
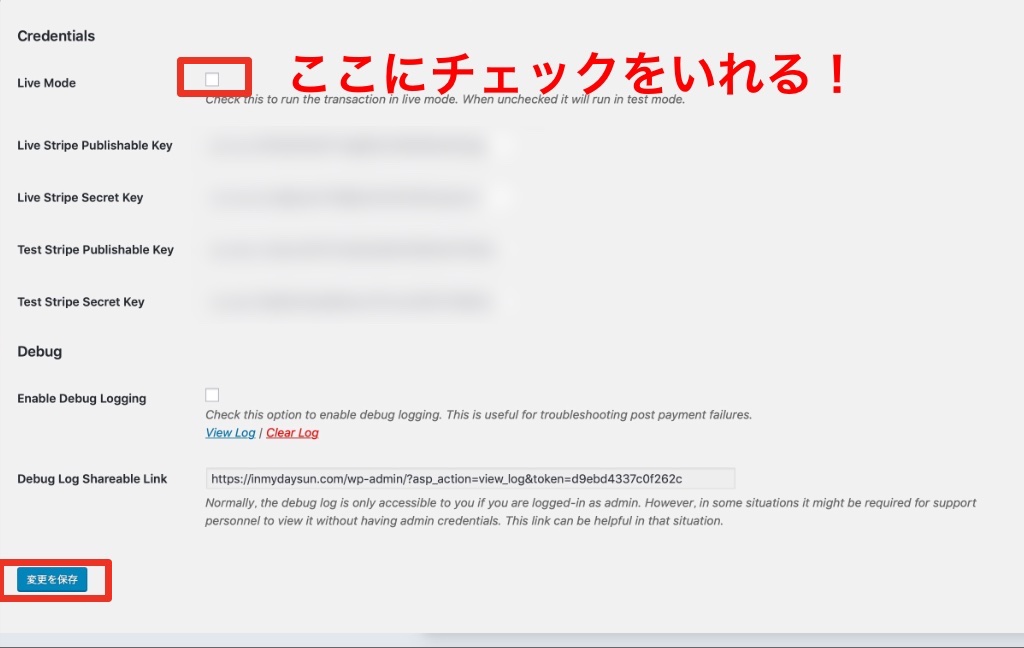
Now, let’s go back to the free page and view the payment screen again. If the word “TEST MODE” is missing, it is a success.
9-2. Pay with a real credit card
Enter your credit number. By default, Stripe accepts VISA, MASTER, AMEX and Diners. It may vary a bit from country to country or region to region.
Check to see if you’re receiving emails as well as the test mode.
9-3. Check your deposit in Stripe’s dashboard
After making a purchase, go into Stripe’s admin screen and make sure that the actual payment has been made. The tab “Displaying Test Data” is turned off.
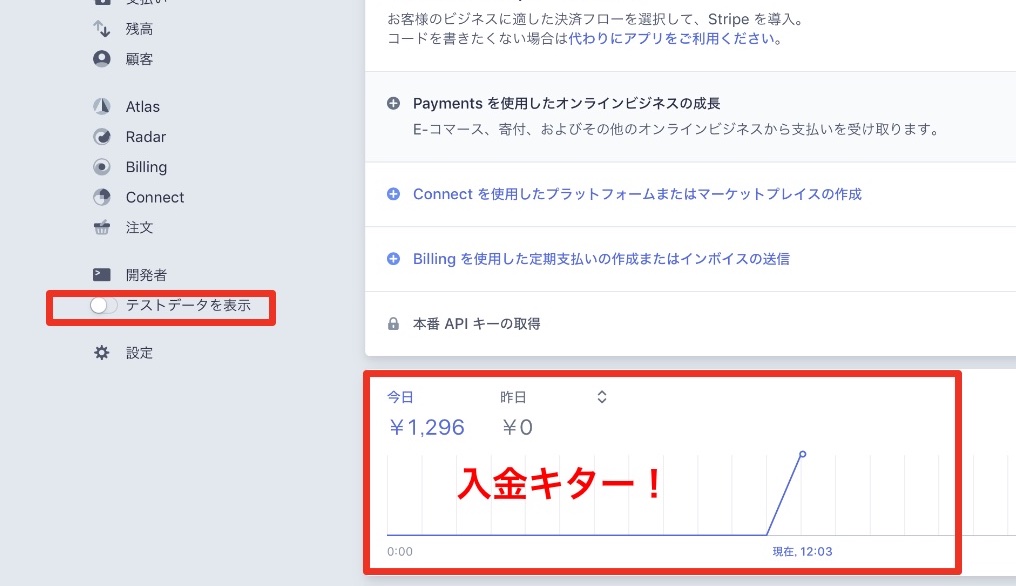
We were able to confirm the payment by checking the operation in production mode.
9-4. Cancellation of Payment Processing
Now, if you leave it like this, you’re paying for your own site and you’ll lose out on the commission. If it’s only a loss, but if you are a business owner, you may be suspected of padding your sales, so be sure to cancel the test payment.
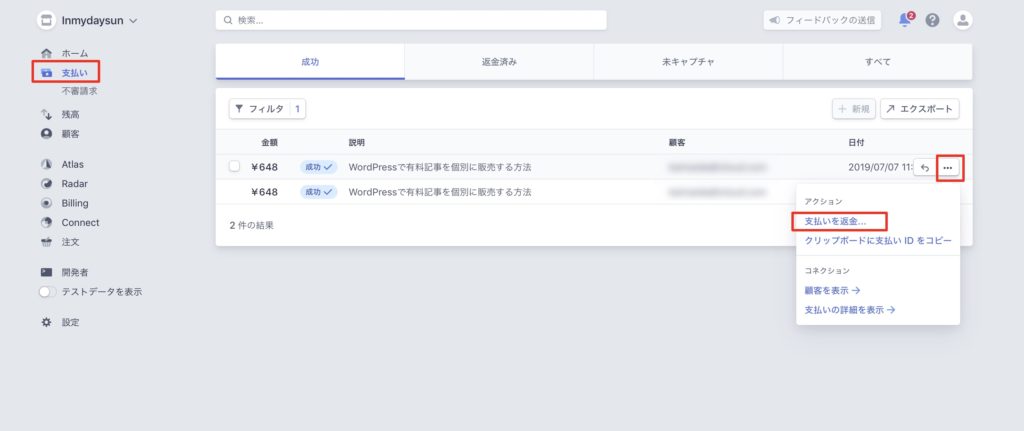
From the Stripe dashboard, select “Payment” and then select the right-hand side of the sale, “…”. A pop-up will appear and you will have to choose “Refund Payment”.
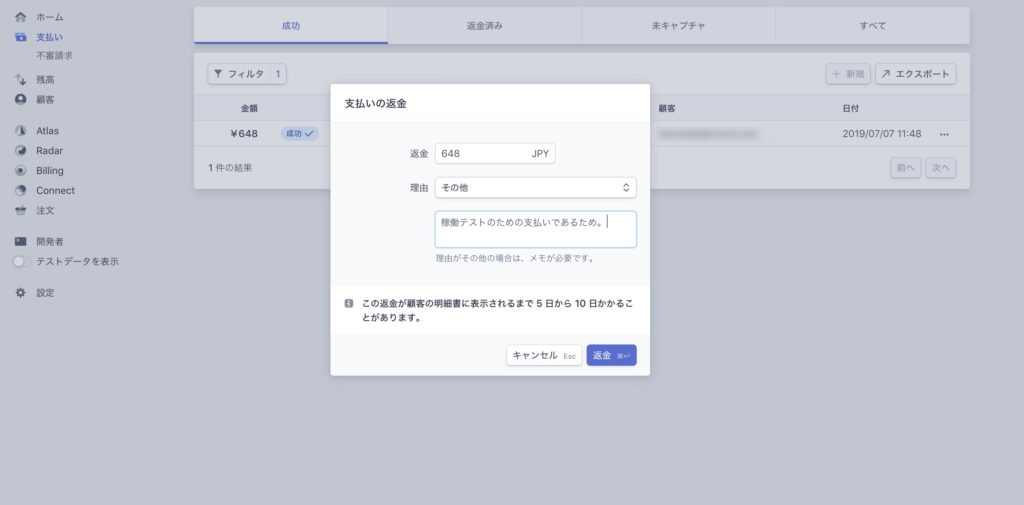
Since you will be asked for the reason for the refund, it is a good idea to write something like “payment for a production test”. Please note that the actual test should be limited to two or three times. Do this too many times and you may become suspicious.
That was the refund process. The same applies to the cancellation of two purchases made by mistake from inquiries, etc.
10. Verify your identity and receive payment for Stripe
It was good to do at the section 2,
but I put it on the back burner because in the specification of Stripe, the deposit to the bank is not done for 7 days from the first settlement.
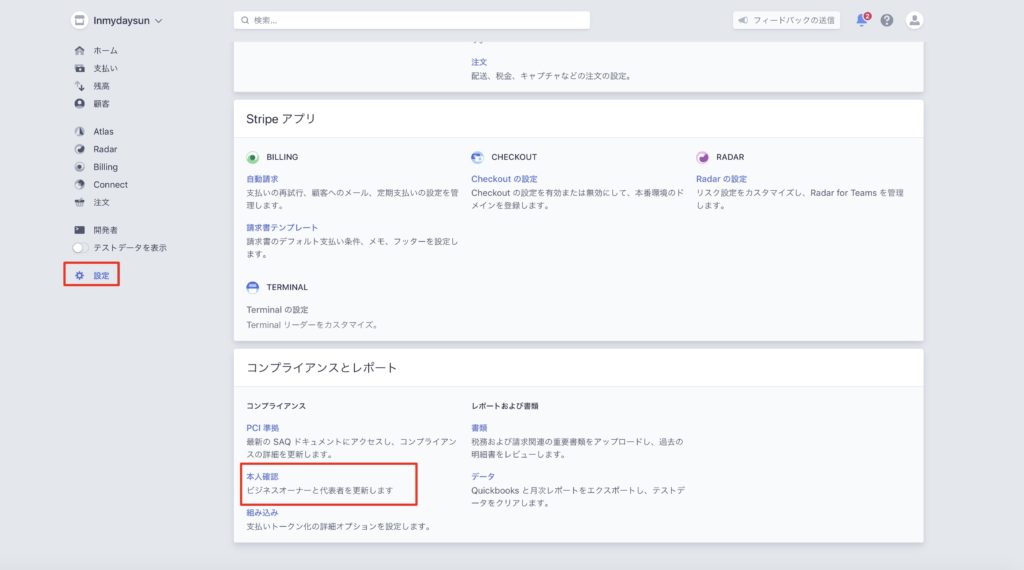
Select Business Settings > Identity Verification at the bottom left of your dashboard.
Answer the questions according to the questionnaire.
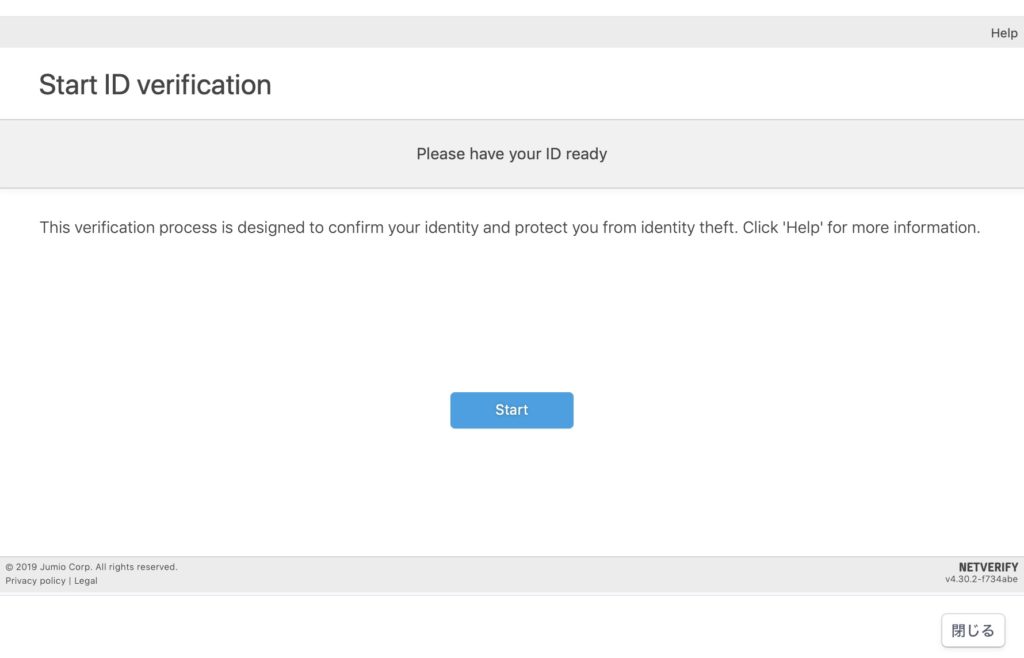
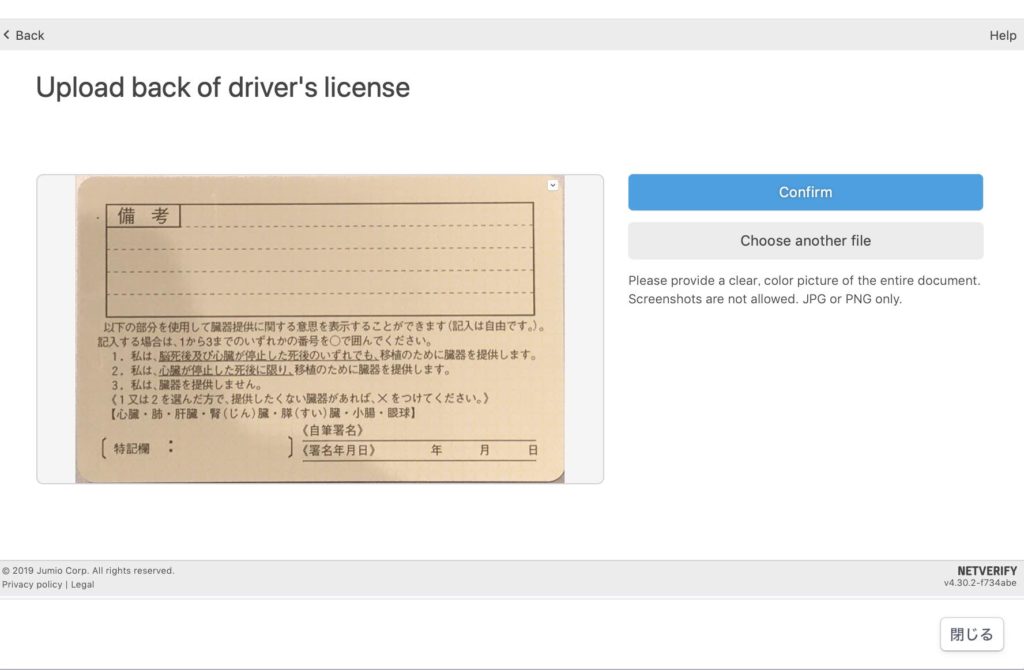
Select the identification documents you want to use. Passport, driver’s license, etc. It varies from country to country and region to region.

In my case, I registered my driver’s license.
11. Do not let others copy the article (optional)
This is an optional field. In the world of the Internet, it is often the case that an article you have worked so hard to write will be copied. In such a case, a copy guard plugin is useful.
In the dashboard of WordPress, go to the menu bar and select “Plugins” > “New” and type “WP-Copyright-Protection” in the search field. The useful point of WP-Copyright-Protection is the following three points.
- Basic operation is easy with only on/off.
- Only you, the administrator, can be set to be copyable
- You can specify an article and make it copyable
I’ll leave out 1. because it’s OK to just enable the plugin. As for 2 and 3, when you install the plug-in, “WP-Copyright-Protection” will be added following the setting of the dashboard. Click here to open the screen below.
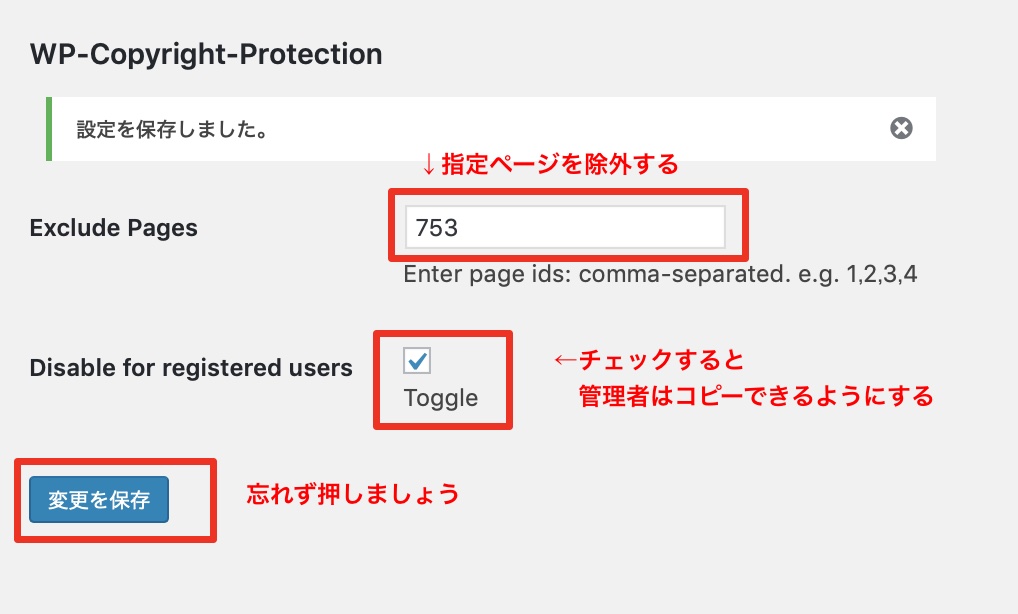
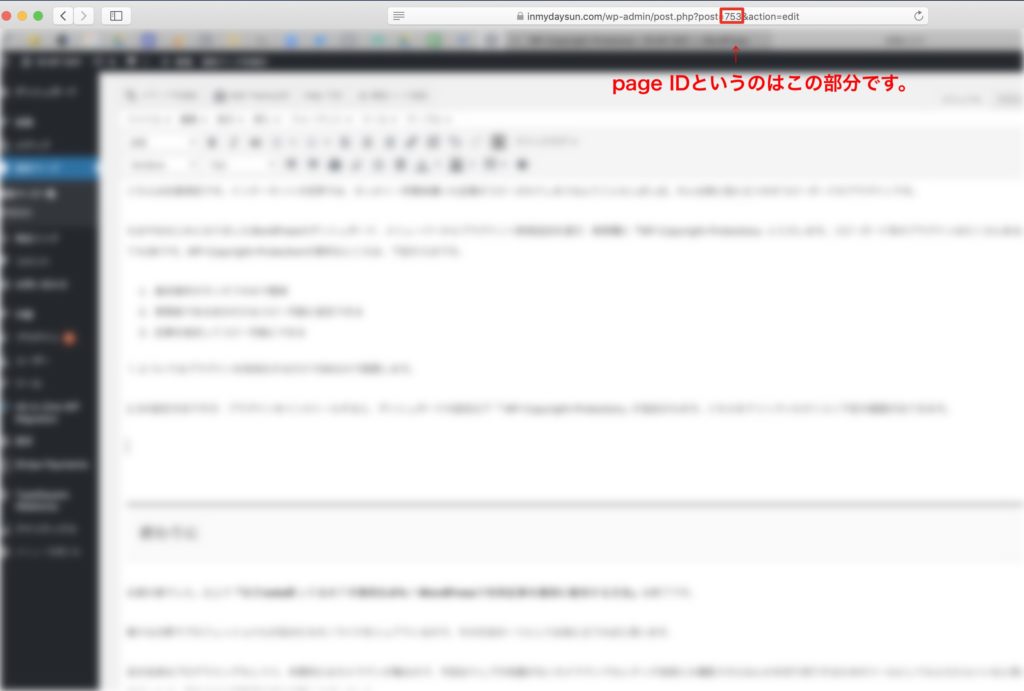
The Page ID is this part of the article. Confirm the ID of the article you want to exclude from the copy guard, and enter it in the Exclude Pages field separated by a comma.
This completes the copy countermeasure. If you want to create a copy page, you should create a separate page that excludes the copy guard and send a link to it.
I don’t want you to copy the article, but please copy more and more of these techniques.
Afterword
Thank you very much for purchasing this article and for reading it to the end.
I wish everyone who reads it the best of luck in their work.
※Please understand that we cannot respond to any inquiries regarding this article, even if you fill out the form. Please contact us at the contact address in the purchase confirmation email.